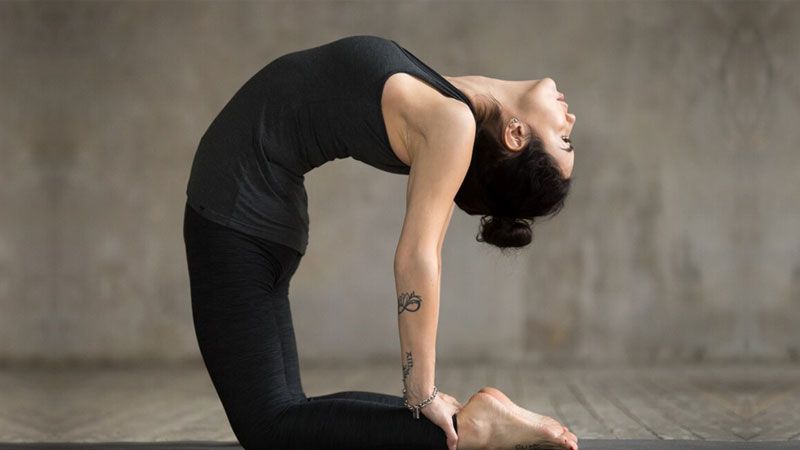
How To Do Back Bends In YOGA? Try These 5 Variations
- 32 months ago
Backbends are great for strengthening your back, shoulders, chest, and hips. They assist in promoting healthy posture by lengthening your spine, increasing flexibility, and improving mobility. They also aid to reduce tension, stiffness, and body aches.
However, these poses are as risky, especially when you're a beginner and not flexible. But, with the right knowledge/guidance, you can prepare your body for backbends and enjoy the benefits without risking yourself. How?
Well, read along to find out. In this blog, we'll talk about the benefits of backbend and how to improve back flexibility in yoga. And by the end, you'll know how to perform backbends comfortably.
3 Vital Parts Of Backbends
A backbend is performed generally in three parts:
- Traction: When the body bends
- Leverage: When the shoulders and the arms support the bend
- Contraction: When the muscles contract to oppose the gravity
Benefits Of Backbend
The entire day our body hunches forward. Also, we perform several activities knowingly and unknowingly that impact your body's alignment and posture. And this can cause a lot of discomfort to our body. Backbends benefit the body in various ways:
- Backbends help move your body in the backward or opposite direction and achieve balance.
- Backbends strengthen your hips, chest, and your back.
- By performing backbends, you can lengthen your spine, improve mobility flexibility, which further helps achieve a better posture.
- Backbends may help relieve pain, tightness, and tension in your body.
Emotional benefits of backbends
Backbends open the chest and upper body, activating the Heart chakra and allowing us to be more open in our life; to our emotions, experiences, and relationships.
Related: How does yoga help the back?
How To Prepare Yourself for Backbends?
It's important to prepare for yoga backbend to ensure spinal safety and to prevent any injuries. So, let's get started:
1. Stretch Your Hip Flexors
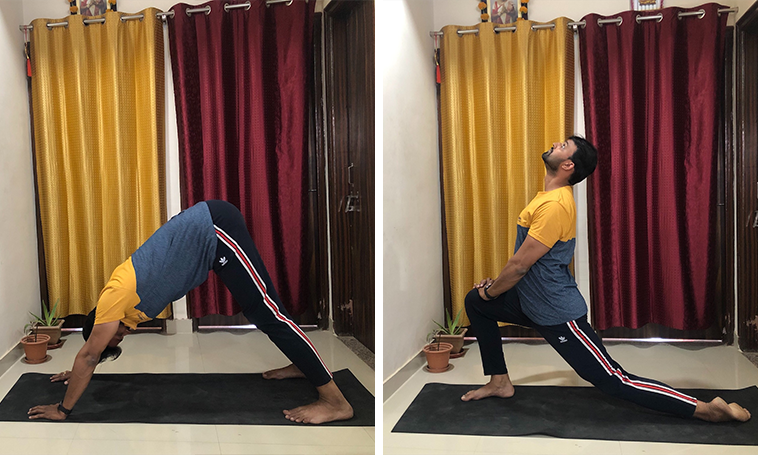
- Get into the position of a downward-facing dog.
- Push your left foot's pinky toe on the yoga mat.
- Now, take your left hip bone towards your right knee. Don't twist your shoulders or knees.
- Push your knee forward.
- Move the sitting bone (right) towards your heel.
- Pull your pubic bone up and feel the left hip flexor.
- Lift your shoulders up & slightly back.
- Create a length in the neck by raising the chin up.
- Now, push your left foot down until the left knee feels lighter.
- Lift your heart towards the ceiling.
2. Mobilize Your Shoulders
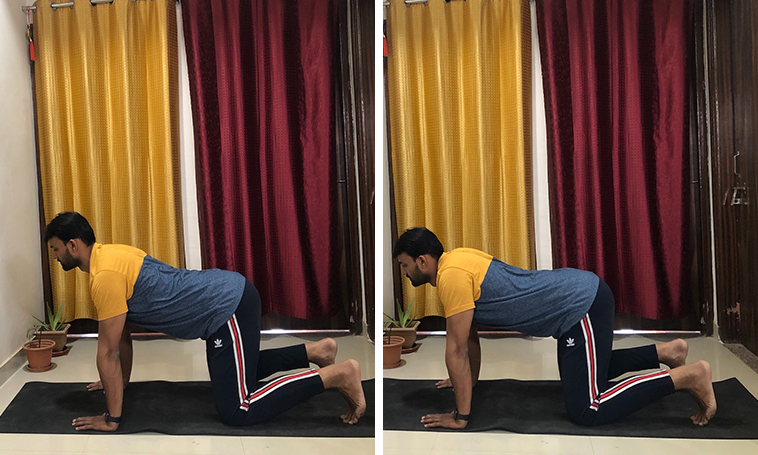
- Get into a tabletop position by tucking your toes and hands under the shoulders.
- Create a high length by moving your shoulders towards your ears.
- Now, bring the arm bones into your socket and soften the space between your shoulder blades.
- Rotate your arms outwardly.
- Move the lower sides of your shoulder blades toward each other.
- Now push your chest forward.
3. Bend To The Sides
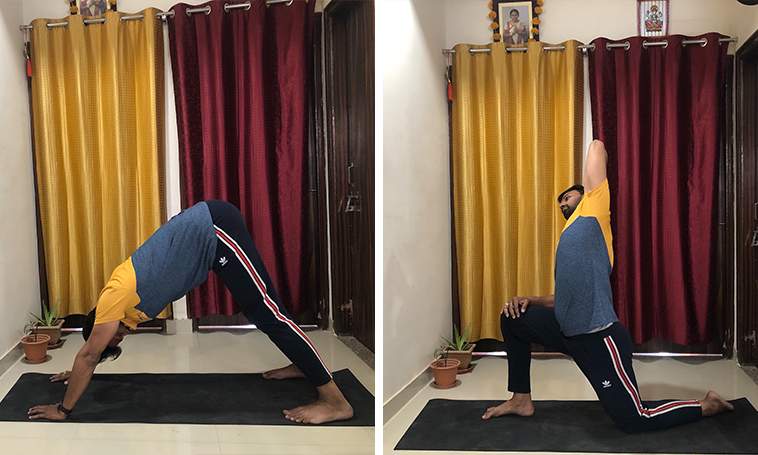
- The transition from the downward-facing dog by stepping your right leg between your hands and left knee on the ground.
- Lift your arm up (left) and place your hands onto your head's back.
- Move your elbow close to your head or rotate outwardly.
- Push your thigh away by placing your right hand on the right thigh.
- Bring your elbow towards your face and bend towards your right.
- Create more length by lifting your left shoulder up.
- Push your armpit back.
- Push your elbow slightly away from your body and create a side bend.
4. Engage The Back Muscles
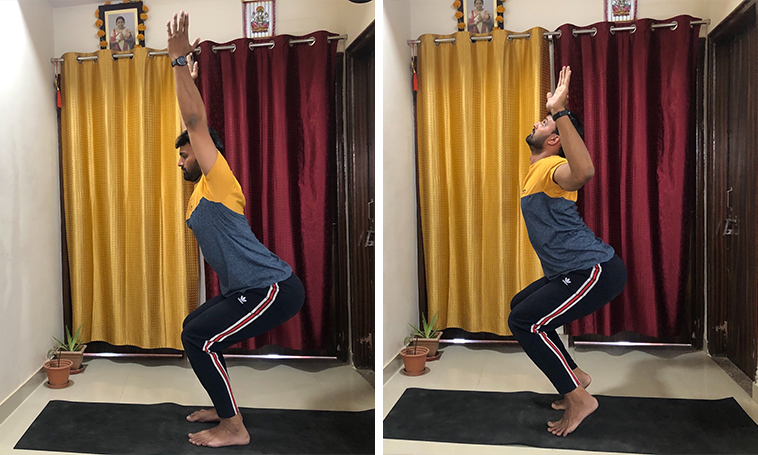
- Start with the chair pose and lift your arms up.
- Rotate your arms outwardly and bend them at an angle of 90 degrees
- Push your hands back and elbows forward.
- Now, lift the heels up.
- Push your elbows down and the chest up and forward.
5. Stretch The Sides Of Your Body
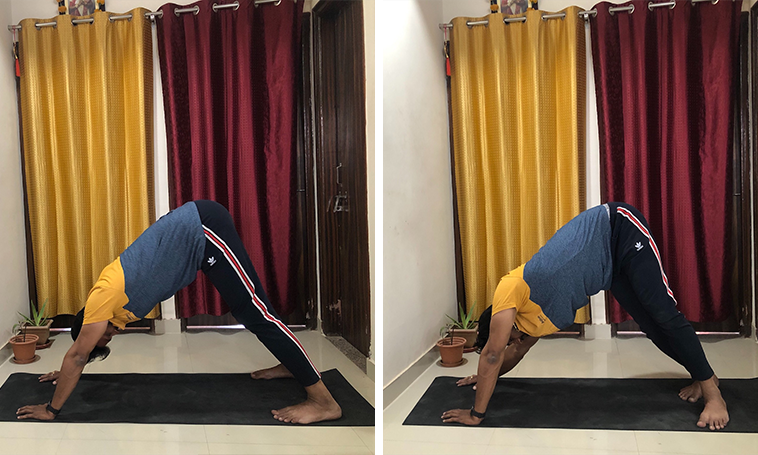
- Get into the downward-facing dog pose.
- Let your heels drop towards the right side.
- Push your buttocks backward and create a side stretch on the left side of your body.
- Now, push the left hand away from you with force towards the mat.
Please Note: While you can follow the steps stated under each exercise, you can always modify them as per your convenience. After all, the motive here is to prepare your body to safely perform backends.
Also check out: Yoga Poses to Fix Back and Neck Pain Issues
Safety tips and advices
- Make sure you warm up before getting into any yoga posture
- Be mindful to how your body aligns
- Protect the bend from overarching
- For a solid core, draw the limbs toward the midline.
- Pull the belly in and up to activate the belly lock.
- Pull your pelvis away from your skull.
- Relax your arms and lower back.
- Maintain a long neck. This will prevent neck strain during yoga backbends.
What Backbends Can you Perform Right Away?
Here are some amazing beginner-friendly backbend poses:
1. Cat-Cow Pose (Marjariasana)
It warms up your spine and increases flexibility. Refer to the image to perform the Cat-cow pose.

- Commence by coming on to all fours.
- Confirm that the shoulder is over the wrist and that the knees are right beneath your hips.
- Inhale slowly, let the belly fall down, and roll the shoulder backward.
- Now, look up towards the sky/ceiling.
- As you breathe out, do the opposite.
- Let the belly suck in inwardly, and stick out (expand) the rib cage upwards.
- Pause and gaze towards your navel.
- Now, recap the process as you inhale and exhale.
2. Sphinx Pose (Salamba Bhujangasana)
It enhances mobility, posture, and flexibility.

- Lie down on your stomach with your hands on your sides and your forehead on the ground.
- Grab your toes together.
- Bring your hands forward so that your palms are at the level of your head.
- The palms are pointing down, and the forearm is resting on the floor.
- The elbows are flexed.
- Inhale deeply and lift your head and torso off the ground.
- The navel area should stay on the floor.
- Take a step forward.
- Try to utilize less forearm support for maximum benefit.
- The power of the back muscles keeps the torso lifted higher.
- Maintain this position for as long as you are comfortable.
- In this position, breathe gently and naturally while maintaining awareness.
- Lower yourself slowly to get out of the posture.
3. Cobra Pose (Bhujangasana)
This pose also helps achieve good posture. Here's a tutorial.
- Place your palms on the ground just below your shoulders.
- Tuck your elbows behind you and hugs them at your sides.
- Stop for a moment and look directly at your mat with a neutral neck position.
- Anchor your pubic bone to the ground.
- Inhale and lift your chest off the ground.
- Pull your shoulders back and keep your lower ribs on the floor.
- Keep your elbows hugging your hips. Don't let them join on both sides.
- Keep your neck neutral and your eyes must gaze at the ground.
4. Locust (Salabhasana)
This pose helps activate your leg muscles and core.

- Interlock or just place your hands as shown in the image (if you are an immediate beginner) and raise your chest and knees at the same time.
- Keep your legs and feet as close together as possible by zipping them together.
- Raise only your upper or lower body before attempting to lift both at the same time.
5. Fish (Matsyasana)
It helps strengthen your neck and back and also improves posture.

- Bring your hands to your sides, then press into the floor as you elevate your chest to form a back bend.
- Place the crown of your head on the ground.
- Stay in the position as long as you feel comfortable.
Can I Start Backbends In Yoga Without Being Flexible?
No one says that you need to be flexible first before practicing it. You can just start with some easy poses whenever you feel comfortable and slowly move towards the difficult ones as flexibility improves. So, yes, you can start yoga without being flexible. However, make sure to not jump into backbends right away.
Wrapping Up
Although you can perform most yoga poses without being too flexible, backbends particularly require some flexibility. So, follow the above steps and prepare your body for backbends. And once you're ready, you can perform yoga backbends while ensuring spinal safety.
